
Creating a beautiful Hello Kitty cake is a delightful way to bring joy to any special occasion. This step-by-step guide will help you create a cake that not only looks fantastic but also tastes delicious. We’ll cover everything from baking the cake layers to decorating it with a Hello Kitty design. Let’s get started!
Ingredients and Tools
Cake Ingredients:
- 2 ½ cups all-purpose flour
- 2 ½ teaspoons baking powder
- ½ teaspoon salt
- 1 cup unsalted butter, room temperature
- 2 cups granulated sugar
- 4 large eggs
- 1 cup whole milk
- 2 teaspoons vanilla extract
Frosting Ingredients:
- 2 cups unsalted butter, room temperature
- 5 cups powdered sugar
- 2 teaspoons vanilla extract
- 4-6 tablespoons heavy cream
- Pink and black gel food coloring
Decorating Tools:
- Round cake pans (8 or 9 inches)
- Piping bags and tips
- Offset spatula
- Fondant in white, pink, black, and yellow
- Rolling pin
- Hello Kitty cookie cutter or template
- Cake Board
Step 1: Baking the Cake Layers
First, preheat your oven to 350°F (175°C). Grease and flour the cake pans to ensure the cakes don’t stick.
Next, mix dry ingredients by whisking together the flour, baking powder, and salt in a medium bowl.
In a large bowl, cream butter and sugar together with an electric mixer until light and fluffy, about 3-4 minutes.
Then, add eggs one at a time, beating well after each addition. Mix in the vanilla extract.
Gradually, combine ingredients by adding the dry ingredients to the butter mixture, alternating with the milk. Begin and end with the dry ingredients, mixing until just combined.
Divide the batter evenly between the prepared cake pans. Bake for 25-30 minutes or until a toothpick inserted into the center comes out clean.
Finally, cool the cakes in the pans for 10 minutes, then transfer them to a wire rack to cool completely.
Step 2: Preparing the Frosting
First, beat butter in a large bowl until creamy.
Gradually, add sugar one cup at a time, beating well after each addition.
Next, add vanilla and cream. Mix in the vanilla extract and 2 tablespoons of heavy cream. Beat on high for about 3 minutes. If the frosting is too thick, add more cream, one tablespoon at a time, until you reach the desired consistency.
Then, color the frosting by dividing it into three portions. Leave one portion white, color the second portion pink, and color the third portion black.
Step 3: Assembling the Cake
First, level the cakes if necessary, using a serrated knife.
Place one cake layer on a cake board and spread a layer of white frosting on top.
Next, place the second cake layer on top of the first and apply a thin crumb coat of white frosting over the entire cake. Chill in the refrigerator for 30 minutes to set.
Finally, apply a smooth, final coat of white frosting over the cake.
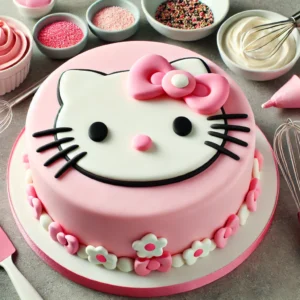
Step 4: Decorating with Hello Kitty
First, roll out fondant to about 1/8 inch thick. Use the Hello Kitty cookie cutter or template to cut out the face shape.
Then, create features by using the pink fondant to create Hello Kitty’s bow, the black fondant for the eyes and whiskers, and the yellow fondant for the nose.
Next, assemble the face by attaching the fondant pieces to the white face using a small amount of water or edible glue.
Finally, place the face on the cake. Use the pink frosting to pipe decorations around the cake, such as hearts or stars.
Tips for a Perfect Hello Kitty Cake
- Use Gel Food Coloring: Gel food coloring is more vibrant and doesn’t affect the consistency of your frosting or fondant.
- Keep It Cool: Fondant can become sticky and hard to work with if it gets too warm. Keep your fondant cool but not refrigerated.
- Smooth Finish: For a smooth frosting finish, dip your offset spatula in hot water, wipe it dry, and then smooth the frosting.
Conclusion
Creating a Hello Kitty cake is a fun and rewarding project that can make any celebration extra special. By following this guide, you’ll be able to bake and decorate a cake that looks as amazing as it tastes. Whether you’re making it for a birthday, an anniversary, or just because, your Hello Kitty cake is sure to be a hit!